Sunday, November 6, 2011

Groovy Baby

Break out the bell-bottoms, put on your tie dyed t-shirt, play some Hendrix, and hang loose.... Yeah baby, it's a 60's themed party. I hope the fuzz don't show up and try to break up our good time.

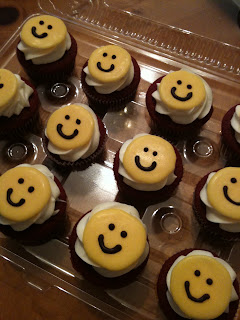
I had so much fun making cupcakes full of peace, love, flower power, and smiley faces... You dig, man?

I was going to get a chocolate mold to make the chocolate decorations, but instead I did them by hand.  I printed out a picture of a peace sign and a smiley face to use as an outline.  I put some clear wax paper over the print out and traced the picture in chocolate.  The trick is to put melted chocolate into a small molding bottle (or you can melt it in the bottle) so you can use it like a pen.

For the peace signs, I used white chocolate. Once they were completely hardened I brushed on some food coloring. Use a paper towel to wipe off the food coloring before it dries (to keep it from clumping up on the chocolate). Once the color dries you could add another color over it to get a tie dyed effect.


Monday, October 31, 2011

Happy Halloween!

I hope that you all had a wonderful Halloween and you got more treats than tricks.

Over the weekend I some simply delicious Halloween cupcakes to help celebrate.


Thursday, October 20, 2011

Oh Boy!


There is nothing better than the anticipation of a new baby coming into the family. A little baby make the future look so much brighter.

Soon, a little man named Mason Finn will be joining this world.  To help celebrate his arrival I made cupcakes that matched the baby show invitations. Lucky for me, my sister-in-law made the invitations, so I was able to get the images she used to make these toppers.

IMG_0653

I have to thank 3 very special ladies that helped make these cupcakes. I don’t know what I would have done without their talents and skills.

Thank you Elizabeth, Emily, and Nancy. You did such a great job! 

IMG_0654

Tuesday, October 18, 2011

Cracking Up


Ok, so I’ve been practicing with cake pops and have learned so much since the first time I tried to make them. One of my biggest challenges was the CRACKING! I would make my pops and put them in the fridge to set. Then I would take them out and dip them. All would look good until about an hour passed…. then the cracking would begin.

I was so grateful to find a video from pintsizebaker.com on how to fix a cracked cake pop. The problem is that I can’t seem to find the video anymore. So here is how you fix your cracked pops.

  1. Let the cake pop hit room temperature. (I let mine sit overnight.)
  2. Melt your chocolate and dip a tooth pick into the chocolate.
  3. Run the toothpick over the crack filling the crack with chocolate.
  4. Run your finger over the crack to remove excess chocolate and to smooth the chocolate into the crack.
    • If the crack is still visible use the tooth pick to spread more chocolate over the crack and repeat step #4.
  5. Keep running your finger over the crack until the crack is completely sealed with chocolate.
    • The warmer your finger is the better. It gives you an opportunity to mold the chocolate over the crack.

Ahhh… beautiful cake pops…

IMG_0657

Sunday, October 16, 2011

Welcome to Boston

Its been a while since I’ve posted to my blog but that doesn’t mean that I haven’t been having fun with new cupcakes. I’ve been a bit distracted with some other things going on in my life ;)  I have tons of pictures and posts to share with you and I’ll try to get them all posted soon.

I recently made some cupcakes that were Boston themed. What better way to welcome some family, friends, colleagues, foreign exchange students - whoever you have coming into town.

Red Sox, Bruins, Celtics, Paul Revere, Duck Boat, on and on and on… There are so many wonderful things that represent Boston. (Oooh, as I’m writing this I’m thinking I should have made Sam Adams beer flavored ones…. YUM!)

I love the ways these turned out.

IMG_0607a

Wednesday, August 24, 2011

Fifty is Nifty

My friend was throwing a surprise 50th birthday party for her sister and asked me to make some cupcakes to help celebrate the milestone.  I was trying to come up with something fun so I did a couple of different designs. 

I made some quick little chocolate swirls and put them in the top of each cupcake. I used some silver dusting powder (edible, of course) to give some sparkle to the chocolate swirls and the fondant decorations. They came out so great.

IMG_0632

On other cupcakes, I put some photos of her as a little girl and others with an adorable picture of her today.

IMG_0634 

Happy Birthday Laura!!!! I hope you had a great time at your party. 

Saturday, July 23, 2011

It’s a Big Deal


I think a birthday is a Big Deal!  Even those people who say “I don’t want to make a big deal about my birthday” really like it when someone makes a big deal about their birthday. 

A birthday is your special day that deserves to be recognized and celebrated with your friends and family.  Even if it’s a small gesture like saying “Happy Birthday” in a loud voice… it makes the birthday girl/boy feel special. The older I get the more I realize that every occasion needs to be celebrated (even if it means you’re one year older, yuck!).

Well, today is my friend’s birthday so I knew I wanted to make her some fun cupcakes for her special day.  This was a great opportunity to use the funky letter tappits (plastic stencils) which I purchased a few weeks ago.

IMG_0561

After making the letters , I cut out some fondant circles to attach them to.  I used colorful fondant for the circles so that the white letters really popped!  Finally, I made some colorful little flowers with sugar pearls in the center to make them fun and feminine.

IMG_0569 
I just love the way the turned out.